Thursday, 28 January 2016

Recently I found myself with a half day spare, and a set of heated mirror elements for the Defender. So I thought I’d make the most of both of these and fit them. Of course it turned into a much bigger job than I expected and ran into another day. The outcome of this over running is that I neglected to take photos of my work. So this post will only have 4 photos……. pretty poor, even I’m disappointed.

I opted for the Mud Stuff heater mirror elements and kit, as couldn’t be bothered to source parts. Nice kit, comes with some twin core cable that’s pre-contained so looks presentable when exposed.

The first part was to disassemble the mirror and make it suitable to run cables through, this part of the fitting is detailed in the instruction supplied with the heating elements, also on the Mud Stuff website and from www.xtremelandy.co.uk, which they borrowed it from. The most challenging part was removing the rubber ring from the mirror, it was very tight. Once off the glass can be removed and cleaned so the heating element can be stuck on.

Next was to modify the mirror arm to allow the cable to pass through it, first hole was downwards / upwards through the mirror ball.


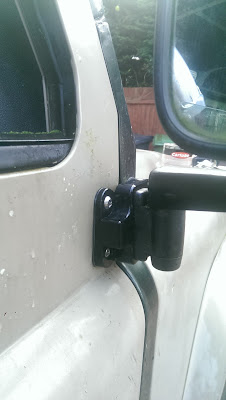
Then sideways into the mirror from the arm into the main vertical section. This gave the cable a route from the back of the glass through the mirror arm to the hinge. So next the newly installed hinges needs to be cut back to allow the cable to pass through into the door. This was not pleasant to do considering how much I just spent on the hinges. But I got on with it. The first side I used only a die grinder attachment, which works OK, but took a long time. Second time I drilled it twice.


The used the die grinder to remove the rest which was a much better result.


Then it was simply a case of drilling the door and putting the cable inside the cab, then refitting everything.


Almost couldn’t tell! I decided that I would put connectors on the cable so that if need to take the door off (which I will), it will be easier. From here it was a case of connection to power, earth and the switch. The blank spaces on the Raptor dash are filling up (I will get a picture of this!). What I will add is the Mud Stuff instruction end and getting the cable through the door and putting it into the A pillar. However I found it impossible to go anywhere from this point unless I went down under the body, so I remove the cable back to the internal side of the upper hinge a bridged the gap from here to the back of the dash. I must admit it doesn't look OEM, but I think it better than going under the bulkhead, across the outrigger, up the outside of the bulkhead and into the dash from here. Personal choice I guess.


That’s all, hopefully next job will be the headlining or lighting……..

Thursday, 7 January 2016

Already another blog! Well this is actually catching up from the last year. In May of 2015 some friends and I went to Wales to do some green laneing, and tackle the notorious Strata Florida.

Overall it was a very enjoyable trip.

Our day started very early, and involved heading down the M4 to Wales.


 Once in South Wales met up with the other two in our weekend party and headed north through Wales to the edge of the Snowdonia National park.


Unfortunately just before reaching the first Lane of the day, my Defender lost drive. Applying power resulted in lots of noise. My friend noted the props were still moving, so I assumed I’d lost a diff as I had no loud noise as if a half shaft had given up – fortunately note the case, but more on that later. At the time I pulled over to remove the prop and half shafts (to avoid further damaged to the diff), we had determined it was the rear when we pulled up.


Once complete I stuck it in diff lock and off we went! Albeit slightly disadvantaged by having a front wheel drive Defender – but it could have been worse.

A short drive later and we were at the first green lane, which happened to be a fairly steep but not aggressive uphill section, which I instantly got stuck on. As all the weight shift to the back the front wheels lost traction and dug a hole. Not a great start. So my friend pulled my Defender plus his own up. This would be come fairly familiar over the weekend.


The day flew by and we tackled many fun lanes around Wales on the approach to the big one, Strata Florida. Some of which my Defender had to be assisted……


We even stopped for a spot of lunch on the side of a hill, accompanied by some sheep.


Then on to more lanes.


At the end of the first day we made camp in some woodland. This is what the camp site looked like when we pitched – it look very different at 3am in the howling wind and pouring rain as our tents fell in on themselves!


The next day came, and the very next lane was the start of the Strata Florida, the part which I was fearing somewhat. Initially my fear was borne from taking a Rover V8 through a river – which they hate, and it’s generally consider a bad idea, unless you have spent some time and initiative water proofing the V8 – which I hadn’t done (not even WD40 or some form of petroleum jelly!!). I now also had the additional worry of only having front wheel drive! So not ideal, but regardless we trooped on, and she did great, made it through all sections without aid.


Was a great weekend, and I much prefer the Welsh lanes to the scratchy, boggy lanes in England. But it did generate some work, which turned out not to be the diff, but more worn half shaft and drive plate, so a nice simple fix (didn’t get pictures sorry, but I’m sure you can work it out).

That’s all for this post, but what I would say is, what remarkable vehicles Defender’s truly are. While mine was half what it should have been, my friends Defender pulled my Defender plus its own weight over some fairly tricky obstacles – which was very impressive. And even though my Defender spent a fair time on tow, it still did some impressive obstacles FWD only. I can’t help but be impressed. I’m probably biased.

Monday, 4 January 2016

Exhaust Noise

When I installed the exhaust I intended to put up a video of the noise it makes, but never got around to doing it. Then it failed to upload.

Well now it works, so here it is:


So 17 months since my last blog – this is a record. Once again the reason for my lack of progress is my home, which thankfully is extremely close to completion, and just as close to being put up for sale! With this almost new found freedom, I have found some time to get out and work on the Defender – I also had to do some work as its MOT is due.

First Job I got stuck into was fixing the driver side door, which would not stay latched – causing it to fly open around corners, or over bumps. The classic bungee cord between the door handles has done the job up until now, but I’m not sure this would get past an MOT inspector, the problem had to be solved.

Not long ago I had replaced the latch to the driver’s door (Jan 14), my first error was buying a copy part, second was not noticing the level of play in the hinges. This play, and the poor quality of the part has led to the latch being damaged so much that it does not hold the door closed, but simply gives up under a bit of pressure – whether its locked or not. So new latch and new hinges.

The old latch was removed and the new genuine part installed – the difference between the two is easily noticeable. The construction of the genuine version is far superior and the gauge of metal is also thicker – but it did cost twice the price…..

Then the hinges where removed.


 And replaced with solid aluminium Optimill Hinges, I opted for these for a number of reasons: cost wise at £260 they were more expensive then genuine hinges, but they don’t need painting as they are anodised. The Britpart equivalent were £10 less, so with that in mind they must be a bargain! The quality is superb, the pin that joins the two sections is twice the size of that of the genuine items. They also come with security fixings, which are far tougher than the stainless bolts they replace. All components are either stainless or ally, so no corrosion, and they look very nice. I’m very pleased with these, and there is zero plan in the doors now, in fact when you lift the door the whole Defender moves. The doors close smoothly and far easier.


I also found some time to fit the checker plate to the rear load area. Now I’m not a huge fan of checker plate, and this will defiantly be the largest area of the stuff on this vehicle. But it does offer protection and grip, while also looking half decent. But this is it! Only the wing tops (maybe bonnet not sure), in black will be covered in checker plate going forward.

So firstly I did the easy bit, the floor area. It was made up of two bits and held in place with lashing eyes and some rivets.


Next I moved on to the wheel arches, which was more of a pain. Firstly the material was cut into two sections, left and right.


I wanted each side to be one section as this would look much neater. This presented the problem of trying to bend 3mm checker plate, without a bender or press……
So it was clamped down, with uni-strut on the bending edge.


Then 3 ratchet straps where set up after the bend was started. In this picture the straps have actually done most of the bending seen here, it only needed to be just started.


After much swearing, and hammering on the corner along with huge pressure from the straps, it came out quite nicely! Note if you are going to do this – protect the straps from the edges of the checker plate otherwise it may eat in to and damage your straps. Luckily I had some plastic angles just for this job.


On the left side a lid was cut into the plate for the storage box I made earlier, with hinges.


Hopefully more to come soon!